
DigitalOcean tutorial
Here I’m following How To Secure Nginx with Let’s Encrypt on Ubuntu 22.04.[1] This builds on the LEMP stack resources we’ve already put in place but also requires a fully-qualified domain name (FQDN), so you’ll need to register one to use with the server if you’ve just been using its IP address up to now.
Let’s Encrypt is a free, open-source Certificate Authority providing automated Secure Sockets Layer (SSL) / Transport Layer Security (TLS)[2] certificates (files) that enable both encryption of data between websites and visitors, and authenticate the sites’ identities. Hypertext Transfer Protocol Secure (HTTPS) connections provide a more secure transfer of data and assure website visitors that they are genuinely connected to the URLs shown in their browsers’ address bars.
Installing Let’s Encrypt’s Certbot client
DO’s tutorial[3] recommends that you install Certbot using the snap package, which is native to Ubuntu 22.04.
Check that snap is up to date with:
sudo snap install core; sudo snap refresh coreMake any available updates and then install Certbot by entering:
sudo snap install --classic certbotTo make sure you can run certbot commands, create the following link from its snap repository:
sudo ln -s /snap/bin/certbot /usr/bin/certbotGenerating certificates
We now have everything in place (assuming you’ve followed this walk-through up to here) to dive straight in and generate the certificates. I’m deviating from DO’s tutorial[4] to increase encryption strength for the server and am drawing on Michael Lustfield’s[5] guide Getting a Perfect SSL Labs Score to do so.
Get your certificates from Let’s Encrypt with the following certbot command:
sudo certbot --nginx -d your_domain_name -d www.your_domain_name --rsa-key-size 4096The --rsa-key-size 4096 flag creates stronger, 4096-bit keys (Let’s Encrypt defaults to 2048-bit keys) that will help score maximum security ratings for the certificates.
The system will ask you for an email address ‘for urgent renewal and security notices’. It then asks you to agree to Let’s Encrypt’s Terms of Service,[6] and you need to answer Y to accept these. Next, it asks if you’re willing to share your email address with the Electronic Frontier Foundation (EFF) for email about EFF’s ‘work encrypting the web, EFF news, campaigns, and ways to support digital freedom’ — answer Y or N according to taste.
When you’ve completed these formalities, Certbot moves on to:
Requesting a certificate for your_domain_name and www.your_domain_name

Successfully received certificate.
Certificate is saved at: /etc/letsencrypt/live/your_domain_name/fullchain.pem
Key is saved at:         /etc/letsencrypt/live/your_domain_name/privkey.pem
This certificate expires on expiry_date.
These files will be updated when the certificate renews.
Certbot has set up a scheduled task to automatically renew this certificate in the background.

Deploying certificate
Successfully deployed certificate for your_domain_name to /etc/nginx/sites-enabled/your_domain_name
Successfully deployed certificate for www.your_domain_name to /etc/nginx/sites-enabled/your_domain_name
Congratulations! You have successfully enabled HTTPS on https://your_domain_name and https://www.your_domain_name

- - - - - - - - - - - - - - - - - - - - - - - - - - - - - - - - - - - - - - - -
If you like Certbot, please consider supporting our work by:
 * Donating to ISRG / Let's Encrypt:   https://letsencrypt.org/donate
 * Donating to EFF:                    https://eff.org/donate-le
- - - - - - - - - - - - - - - - - - - - - - - - - - - - - - - - - - - - - - - -
Your server’s now secured with SSL encryption and, as the above responses show, Certbot will renew your certificates automatically. Check that the renewals will work by entering:
sudo certbot renew --dry-runThis should generate the following output:
Saving debug log to /var/log/letsencrypt/letsencrypt.log

- - - - - - - - - - - - - - - - - - - - - - - - - - - - - - - - - - - - - - - -
Processing /etc/letsencrypt/renewal/your_domain_name.conf
- - - - - - - - - - - - - - - - - - - - - - - - - - - - - - - - - - - - - - - -
Account registered.
Simulating renewal of an existing certificate for your_domain_name and www.your_domain_name

- - - - - - - - - - - - - - - - - - - - - - - - - - - - - - - - - - - - - - - -
Congratulations, all simulated renewals succeeded:
  /etc/letsencrypt/live/your_domain_name/fullchain.pem (success)
- - - - - - - - - - - - - - - - - - - - - - - - - - - - - - - - - - - - - - - -
You can check what certificates have been issued and their expiry dates with:
sudo certbot certificatesGenerating 4096-bit DHE parameters
With 4096-bit certificates in place, I’m going to match these, as Michael Lustfield[7] suggests, with 4096-bit DHE (Ephemeral Diffie-Hellman[8]) parameters.
Let’s Encrypt stores its default 2048-bit DHE parameters file at /etc/letsencrypt/ssl-dhparams.pem and I’m going to rebuild this by first removing the original file:
sudo rm /etc/letsencrypt/ssl-dhparams.pemAnd rebuilding it with:
sudo openssl dhparam -out /etc/letsencrypt/ssl-dhparams.pem 4096The server tells you that it is:
Generating DH parameters, 4096 bit long safe primeIt then spools out dotted lines for some time until it completes /etc/letsencrypt/ssl-dhparams.pem.
Reconfiguring the server block for maximum SSL/TLS strength
With the stronger encryption files in place, we need to enable them by reconfiguring our server block. The revisions here are so extensive that the most straightforward approach is to start again with the server block file in /etc/nginx/sites-available. Remove the existing one with:
sudo rm /etc/nginx/sites-available/your_domain_nameCreate a new version in nano by entering:
sudo nano /etc/nginx/sites-available/your_domain_nameI’ve hacked together a configuration that gets a maximum score using the Qualys SSL Labs Server Test.[9] To do this, I’ve drawn on a number of sources — including posts from GitHub[10] and Michael Lustfield[11] — and link to these in outlining the optimised server block below. You can generate more advanced initial configurations using Mozilla’s SSL Configuration Generator,[12] which you can set up according to your server with choices about the configuration style (Modern, Intermediate or Old), your server version (find this using nginx -v), OpenSSL version (openssl version -v) and whether or not to include HTTP Strict Transport Security (HSTS). I used the SSL Configuration Generator to create a basic server block, and developed my optimised version from there.
I’m building this server to host a WordPress site, and have included configuration to accommodate this. My WordPress-friendly settings include modifying try_files to work with index.php files as recommended in Lyn Muldrow’s WordPress setup guide[13] and whitelisting URLs that support WordPress and its output under the Content-Security-Policy header as outlined in SpinupWP’s Install WordPress on Ubuntu 20.04: Chapter 7 – Nginx Security Hardening.[14]
Here’s my optimised server block configuration followed by some notes on what each element does:
server {
        server_name your_domain_name www.your_domain_name;
        root /var/www/your_domain_name;
        index index.php index.html index.htm index.nginx-debian.html;

        location = /favicon.ico { log_not_found off; access_log off; }
        location = /robots.txt { log_not_found off; access_log off; allow all; }
        location ~* \.(css|gif|ico|jpeg|jpg|js|png)$ {
            expires max;
            log_not_found off;
        }

        location / {
            try_files $uri $uri/ /index.php$is_args$args;
        }

        location ~ \.php$ {
            include snippets/fastcgi-php.conf;
            fastcgi_pass unix:/var/run/php/php8.1-fpm-your_domain_name.sock;
        }

        location ~ /\.ht {
            deny all;
        }

    listen [::]:443 ssl http2 ipv6only=on;
    listen 443 ssl http2;

    gzip off;

    ssl_certificate /etc/letsencrypt/live/your_domain_name/fullchain.pem;
    ssl_certificate_key /etc/letsencrypt/live/your_domain_name/privkey.pem;
    ssl_trusted_certificate /etc/letsencrypt/live/your_domain_name/chain.pem;
    ssl_dhparam /etc/letsencrypt/ssl-dhparams.pem;
    ssl_ecdh_curve secp384r1:X25519:prime256v1;
    ssl_session_timeout 10m;
    ssl_session_cache shared:SSL:10m;
    ssl_protocols TLSv1.2 TLSv1.3;
    ssl_ciphers ECDHE-ECDSA-AES128-GCM-SHA256:ECDHE-RSA-AES128-GCM-SHA256:ECDHE-ECDSA-AES256-GCM-SHA384:ECDHE-RSA-AES256-GCM-SHA384:ECDHE-ECDSA-CHACHA20-POLY1305:ECDHE-RSA-CHACHA20-POLY1305:DHE-RSA-AES128-GCM-SHA256:DHE-RSA-AES256-GCM-SHA384;
    ssl_prefer_server_ciphers on;
    ssl_stapling on;
    ssl_stapling_verify on;

    add_header Strict-Transport-Security "max-age=63072000" always;
    add_header Content-Security-Policy "default-src 'self' https://*.google-analytics.com https://*.googleapis.com https://*.gstatic.com https://*.gravatar.com https://*.w.org data: 'unsafe-inline' 'unsafe-eval';";
    add_header Referrer-Policy "no-referrer, strict-origin-when-cross-origin";
    add_header X-Content-Type-Options nosniff;
    add_header X-XSS-Protection "1; mode=block";

}

server {
    if ($host = www.your_domain_name) {
        return 301 https://$host$request_uri;
    }


    if ($host = your_domain_name) {
        return 301 https://$host$request_uri;
    }


        listen 80 default_server;
        listen [::]:80 default_server;
        server_name your_domain_name www.your_domain_name;
    return 404;

}
server {...}: The server block is divided into sub-blocks that define how it should operate in different contexts. Each of these is defined within curly brackets ({ }) following the top-levelserverstatement.root: Determines the directory in which the server stores website files. The default choice is/var/www/html, which is fine for hosting a single domain on the server, but you need to create additional directories (/var/www/your_domain_1,/var/www/your_domain_2etc) to host multiple websites, defining each in separate server block configuration files withrootdirectories set accordingly.index: Sets the default index file format for your domain with fallback formats listed subsequently. Because I’m setting up the server to host a WordPress site, the default here isindex.phpfalling back to HTML (index.htmlandindex.htm).index.nginx-debian.htmlis the ‘Wecome to Nginx!’ test page.server_name: This is the fully-qualified domain name (FQDN) that you pointed at the server’s public IP address and any associated subdomains you’d like to configure. Adding the familiarwwwprefix counts as adding a subdomain — even through URLs starting withwww.usually point to a domain’s homepage rather than a separate part of the site — and so it’s necessary to include awww.extension of your FQDN here.location = /favicon.ico { log_not_found off; access_log off; }: Turns off error logging forfavicon.icofiles.location /: We added thislocationblock (and the next) when installing PHP above. The first one includes thetry_filesdirective, which checks for the presence of a bona fide PHP file at a requested URL before processing it with FastCGI. This helps prevent attacks on the site by the injection of rogue PHP script. Iftry_filesdoesn’t find a file at the requested URL, it returns a 404 ‘not found’ error.location ~ \.php$: This block calls a snippet containing standard Fast:CGI configuration options and the UNIX socket (in this case) connecting the defaultphp-fpmpool. If you’ve configured a bespokephp-fpmpool as described above, you’ll set the socket you created here.location ~ /\.ht: Determines the way in which the server handles.htaccessfiles. Nginx draws its settings from system configuration files (such as server blocks like this one) and not from hidden files in web directories (like.htaccessfiles). Thislocationsetting instructs the server to ignore.htaccessfiles.listen [::]:443 ssl http2 ipv6only=on;: This and the following line instruct Nginx to listen for connections on server port 443, which is the one used for secure (https) traffic. The parameters here allow SSL and http2[15] using IPv6[16] network protocols (we selected IPv6 support when setting up a DigitalOcean droplet above).listen 443 ssl http2;: Instructs Nginx to listen on port 443 for SSL and http2 connections using non-IPv6 protocols.gzip off;: Disables the gzip data compression utility. Turning off data compression helps block attacks on the server through this function. GitHub’s thread[17] Should disable compression when using SSL discusses the value of disabling this performance-enhancing tool. WordPress runs well without the gzip utility enabled and, as this is the purpose of this configuration, I’m turning it off.ssl_certificate: Sets the path to the live SSL certificate we generated usingcertbot. The relevant file here isfullchain.pem, whichcertbotstores (with a domain’s other live certificate files) in a directory with your domain name in/etc/letsencrypt/live.ssl_certificate_key: Determines the path to the SSL certificate key. You’ll find this in the same directory as the SSL certificate above with the filename hereprivkey.pem.ssl_trusted_certificate: Defining an SSL trusted certificate is one of Michael Lustfield’s[18] tips for a perfect SSL Labs score.certbotgenerates a trusted certificate in your domain’s live certificate directory —chain.pem.ssl_dhparam: Calls the 4096-bit DHE parameters file we generated above.ssl_ecdh_curve: Specifies the Elliptic-curve Diffie–Hellman (ECDH)[19] curve to use with the SSL certificate. ECDH provides key-based encryption in which (in the case of a secure internet connection) the server matches public and private keys (similar to the ones we created for SSH) to ensure that it is connected with a particular user with no interventions. Zurgl[20] recommends settingsecp384r1:X25519:prime256v1as Nginx’s defaultprime256v1reduces the SSL Labs test score. I found that using Michael Lustfield’s[21] lonesecp384r1produces a perfect score, but an exploration of the forums showed that it’s more usual to set a trio of curves.ssl_session_timeout: Sets the time for which SSSL key pairs are valid. As Michael Lustfield suggests, it’s better to extend this setting if you expect visitors to spend a while viewing your site so they don’t use server resources generating fresh key pairs each time they download more content. The defaultssl_session_timeoutperiod is four minutes, but I’ve joined Lustfield in setting it at ten, allowing a more than superficial site viewing without triggering multiple SSL sessions.ssl_session_cache: Sets the time for which the data relating to each SSL session is stored on the server. It makes sense to match thessl_session_timeoutperiod here as there seems little point in keeping this information after a session has expired.ssl_protocols: Sets the Transport Layer Security version(s) to deploy.TLSv1.3[22] is the latest version but reverse compatibility issues with older web clients (browsers etc) mean that it’s necessary to keepTLSv1.2in play as a fallback. The ‘Intermediate’ output from Mozilla’s SSL Configuration Generator,[23] for ‘General-purpose servers with a variety of clients, recommended for almost all systems,’ includes bothTLSv1.2andTLSv1.3as shown, whereas its ‘Modern’ configuration is for ‘Services with clients that support TLS 1.3 and don’t need backward compatibility,’ and so omits theTLSv1.2SSL protocol.ssl_ciphers: The cipher suite[24] determined here is that on whichTLSv1.2draws to secure the server —TLSv1.3has defaults that do not need to be defined separately. The ciphers I’ve included here are those given by Mozilla’s SSL Configuration Generator in its ‘Intermediate’ output.ssl_prefer_server_ciphers: Instructs the server to use the above ciphers in transport layer security. Again, this is a measure to ensure reverse web client compatibility viaTLSv1.2. If you define the server block to support onlyTLSv1.3, you need include neitherssl_ciphersnorssl_prefer_server_ciphershere.ssl_stapling: Online Certificate Status Protocol (OCSP) stapling[25] is a way of reducing requests to certificate authorities (in our case Let’s Encrypt) for validation of SSL certificates. Instead of the CA receiving a validation request every time a certificate is accessed, the server holding the certificate requests a time-stamped validation from the CA at regular intervals. The server then attaches (‘staples’) the CA’s time stamp to its certificate so that web clients accessing the site can affirm that the certificate is current and valid. If the visitor’s web client does not receive a valid stapled OCSP response from a certificate-holding server, it can authenticate the certificate with a direct request to the CA, but this requires an additional request to the CA’s server and so slows down the response time of the certificated server as well as increasing traffic to the CA.ssl_stapling_verify: The server verifies that certificates have OCSP validation before returning the stapled certificates to the visiting web clients.add_header Strict-Transport-Security "max-age=63072000" always: This setting configures the server to apply the HTTP Strict Transport Security (HSTS)[26] policy. This determines that web clients can access the server using a secure, HTTPS, connection only, limiting vulnerability to ‘man-in-the-middle’ attacks that exploit the insecurity of plain HTTP connections by interposing malevolent code between the server and web client. Best practice here is to set a long duration for deployment of the policy and the setting recommended by Mozilla’s SSL Configuration Generator is toalwaysapply HSTS, falling back to63072000seconds (2 years) for web clients that require themax-agesetting.add_header Content-Security-Policy "default-src 'self' https://*.google-analytics.com https://*.googleapis.com https://*.gstatic.com https://*.gravatar.com https://*.w.org 'unsafe-inline' 'unsafe-eval' data: https:;": This setting is the one you’re most likely to revisit once your WordPress site is up and running. It determines your policy on trusted sources for your site’s content. The default source (default-src) is, of course,'self'as it refers to the site assets you host on the server. After this, the policy lists the external resources you choose to include as trusted sources. If you use a content distribution network (CDN)[27] to host code, images or video off your server, for example, you’ll need to list the external hosting domain name here. My example server block features some common WordPress feeds includinghttps://*.gravatar.com, which serves avatars for contributors and commenters (if they have Gravatar accounts) on your site, whilehttps://*.w.orgis the WordPress.org site — the asterisk (*) before the domain name is a wildcard to instruct the server to allow subdomains of the permitted sites (eg https://www.example.com etc). I like to embed YouTube videos in my posts and these won’t display unless you havehttps://*.youtube.comlisted here — if you find that anything’s not displaying as expected, this setting on the server block is often the source of the error.'unsafe-inline'and'unsafe-eval'are security vulnerabilities that it’s necessary to allow because WordPress plugins often depend on inline style and script tags and unsafe dynamic code evaluation — you can mitigate the risks from these by using as few plugins as possible and by keeping them updated. Finally, as Digital.com’s post WordPress Security Tips: How To Secure Your WP Blog[28] notes ‘https:anddata:tell that loading resources only over HTTPS and data scheme are allowed.’add_header Referrer-Policy "no-referrer, strict-origin-when-cross-origin":add_header X-Content-Type-Options nosniff: keycdn’s post X-Content-Type-Options HTTP Header[29] explains that the ‘X-Content-Type-Options header is used to protect against MIME sniffing vulnerabilities. These vulnerabilities can occur when a website allows users to upload content to a website however the user disguises a particular file type as something else. This can give them the opportunity to perform cross-site scripting and compromise the website.’ This header setting is, then, an effort to prevent Trojan Horse attacks on your site.add_header X-XSS-Protection "1; mode=block": Mozilla’s MDN web docs[30] state that XSS stands for cross-site scanning, adding that this header enables a feature in Chrome, Internet Explorer and Safari browsers that blocks pages on which it detects XSS. Setting1here enables XSS filtering, whilemode=blockinstructs supporting browsers to block web pages on which XSS is detected.
When you’ve finished editing your server block in Nano, save it by pressing control and X, answering Y and hitting return. Now test your configuration with:
sudo nginx -tEdit the server block again if this test shows that you have syntax errors. When your configuration passes this test, apply your new settings by restarting Nginx:
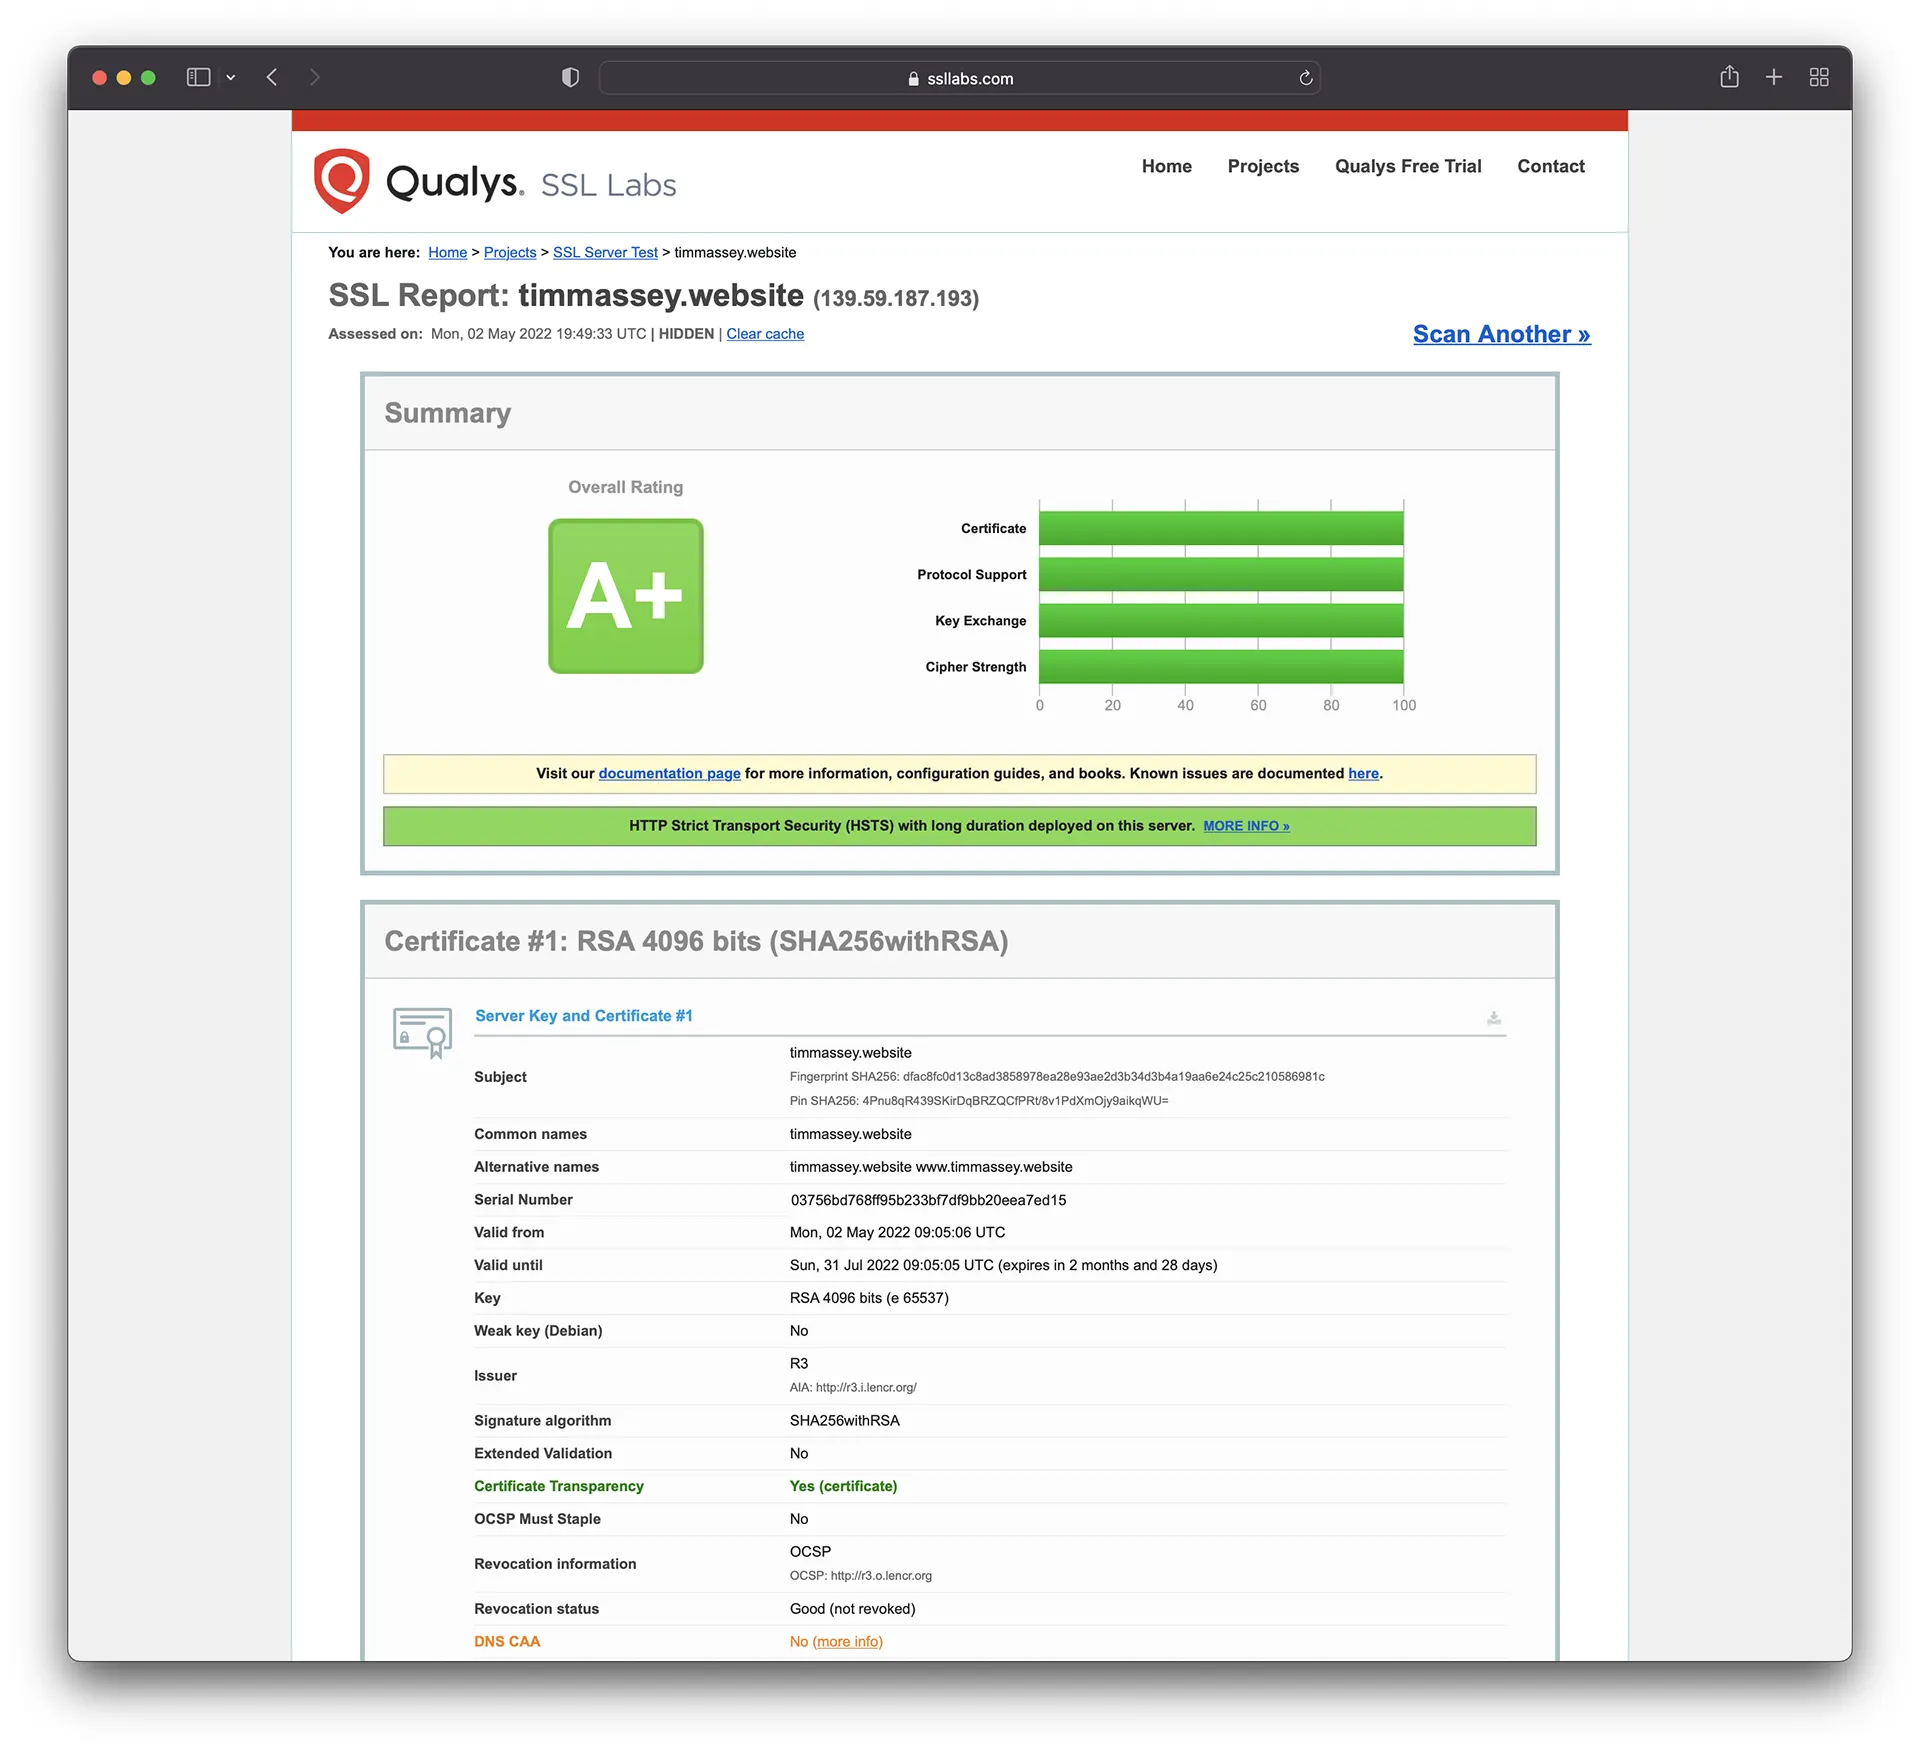
sudo systemctl restart nginxNow test the strength of your server’s encryption using the Qualys SSL Labs SSL Server Test[31]. Open the test page in your browser and enter your newly-configured domain name in the Hostname box. After a few moments, the test produces a full report on the strength of your configuration. Here’s the output for timmassey.website using the above server block:
Notes and references