
DigitalOcean tutorial
I am returning to DigitalOcean’s tutorial How To Install Linux, Nginx, MySQL, PHP (LEMP stack) on Ubuntu 22.04[1] to begin here, but will switch to other guides to configure PHP to work with multiple sites on my server and to optimise its installation for WordPress.
Installing PHP
The final software component in the LEMP stack is PHP, which interacts with the database and outputs the information stored in it. DO’s tutorial[2] points out that Nginx does not support PHP natively and so it’s necessary to underpin it with php-fpm, the ‘fpm’ part of which, the tutorial explains, is an abbreviation of ‘fastCGI process manager’. This step is less straightforward than installing PHP on Apache web servers, which don’t require supplementary software to run PHP.
DO’s guide recommends installing php-fpm alongside php-mysql, which, as its name implies, adds connectivity to the database and also installs the core PHP files. I’m also going to jump ahead a little and install some additional PHP modules to support WordPress (php-bcmath, php-curl, php-gd, php-imagick, php-intl, php-mbstring, php-soap, php-xml, php-xmlrpc, and php-zip — see Step 2 of DigitalOcean’s tutorial How To Install WordPress with LEMP on Ubuntu 20.04[3] for the recommendation of these PHP extensions (we’ll return to this tutorial later) to which I have added php-imagick, an image processing extension for which WordPress’s native ‘Site Health Status’ app calls if it’s not installed on the server:
sudo apt-get install -y php-fpm php-mysql php-bcmath php-curl php-gd php-intl php-imagick php-mbstring php-soap php-xml php-xmlrpc php-zipAdding a php-fpm pool
While I’m setting up only one website in this walk-through, it’s helpful to configure the server to allow adding further sites easily later. Each site calls PHP using separate php-fpm configuration files, known as ‘pools’, one of which we’ll set up for our initial Nginx server block below. (If you plan to host only one site on your server, you can call the default php-fpm pool as shown in the next section and skip creating a dedicated pool for your site.)
Change of DigitalOcean tutorial
DigitalOcean’s How To Install Linux, Nginx, MySQL, PHP (LEMP stack) on Ubuntu 22.04[4] covers only a default, single site installation of the stack. I’m drawing much of the following on configuring php-fpm pools from an earlier guide, How To Host Multiple Websites Securely With Nginx And Php-fpm On Ubuntu 14.04.[5] Although this relates to an earlier Ubuntu distribution and is a little out of date in parts, it also works with 22.04.
For improved security, it’s best to run php-fpm pools under users and user groups specific to each one. I’m going to use my non-root user and group (lempstack), which I set up at the start of this guide for my initial site, but it’s best to create an extra user and group for each additional pool.
If you’re hosting a second site on your server, create a user group for it using the following command with an appropriate name:
sudo groupadd your_group_name_2And add a new user to the group with:
sudo useradd -g your_username_2 your_group_name_2The -g flag adds the user at a system (global) level, not just within our non-root user shell. If you just want to host further sites on the same server to administer yourself, you need only create users and groups as above under which to run php-fpm pools for each site. If you’re adding sites for others to manage, you’ll need to apply password protection to the new usernames so that the other users can log in and administer their site files using SSH. I’m not setting up a multi-user environment here.
Having created groups and users for each of your php-fpm pools, the next step is to add configuration files to define the pools. The default directory for these is /etc/php/php_version_number/fpm/pool.d (I’m using PHP 8.1 (the default installation in Ubuntu 22.04 LTS), so it’s /etc/php/8.1/fpm/pool.d for me). Create a new file with:
sudo nano /etc/php/php_version_number/fpm/pool.d/your_site_name.confInclude the following options, which I’ve modified from DO’s tutorial,[6] in your configuration file. The tutorial glosses over the pm. (process management) settings, and (after a little light Googling) I’ve changed these to match those recommended by Mattias Geniar in A better way to run PHP-FPM:[7]
[your_site_name]
user = your_site_username
group = your_site_group_name
listen = /var/run/php/php8.1-fpm-your_site_name.sock
listen.owner = www-data
listen.group = www-data
php_admin_value[disable_functions] = exec,passthru,shell_exec,system
php_admin_flag[allow_url_fopen] = off
pm = ondemand
pm.max_children = 5
pm.process_idle_timeout = 10s
pm.max_requests = 200
chdir = /
The options are:
[your_site_name]: This is the heading for thephp-fpmpool. If you’re hosting a number of sites on the same server, you’ll create a pool for each of them, so it’s most straightforward to give it the domain name (example.com) to which it relates.user = your_site_username: The username under which thephp-fpmpool will run. The user for the default pool (that you call if you skip setting a bespokephp-fpmpool for hosting a single site) iswww-data, which is the username under which the server runs at system level.group = your_site_group_name: The group name to which you added your site-specific username. Again, this defaults to the system user groupwww-data.listen = /var/run/php/php8.1-fpm-your_site_name.sock: The location of the UNIX socket that listens for aphp-fpmconnection. We’ll call this when configuring server blocks.php-fpmgenerates the socket file on startup — we’ll restart PHP to do this after adding these settings. DO’s tutorial[8] places the socket in the system directory/var/run, but it’s usual now to give PHP its own directory within this —/var/run/php— so that’s what I’m doing here.listen.owner = www-dataandlisten.group = www-data: Although we’ve configured ourphp-fpmpool to run under a bespoke user and group, the pool is running on our Nginx server, which needs to be able to access the above UNIX socket, and so we need to grant the server username and group (www-data) access to the socket. We do this using these settings.php_admin_value[disable_functions] = exec,passthru,shell_exec,system: Disables execution of Linux commands by thephp-fpmpool, helping prevent attacks on the server via the pool.php_admin_flag[allow_url_fopen] = off: Turns off thephp-fpmpool’s ability to access files on other servers — another effort to prevent attacks on the server via the pool.pm = ondemand: Sets the way in which the server launches PHP processes. For sites with low traffic levels, Mattias Geniar[9] advises setting this toondemandas shown. This conserves the server’s resources because it launches processes in response to users’ requests rather than keeping them active in readiness as with the widely-recommendeddynamicsetting.pm.max_children = 5: Limits the number of calls on an active PHP process to five at one time — see Geniar’s post[10] for further details.pm.process_idle_timeout = 10s: Kills idle PHP processes (those not serving user requests) after ten seconds helping ensure that server capacity is not used unnecessarily.pm.max_requests = 200: ‘The number of requests each child process should execute before respawning.’[11] This is another effort to ensure efficient use of server resources. It instructs PHP to reuse spawned (active) processes (in this example) up to 200 times before respawning them. This prevents the server spawning duplicate processes and so consumes less memory.chdir = /: Sets the working directory to the root (/) of the server block in which thephp-fpmpool is used. We’ll set this in the following section.
Save your php-fpm pool configuration file and exit nano. To activate your new pool, enter:
sudo service php8.1-fpm restart(I’m using PHP 8.1, so it’s sudo service php8.1-fpm restart.)
Setting pm = ondemand in the above configuration file means that we have no php-fpm processes running until they’re spawned by user requests. The DO tutorial’s advice to check for these processes by entering sudo ps aux | grep your_site_name, will, therefore, show no active php-fpm processes, and we’ll need to test whether our php-fpm pool is functioning correctly by calling it in a server block.
DO’s tutorial recommends disabling OPCache to avoid exposing the server to security risks associated with its configuration. OPCache is off by default in recent versions of PHP.
Creating an initial Nginx server block
With the full LEMP stack in place, it’s necessary to finesse the Nginx web server’s configuration a little more to get PHP up and running. This involves creating a server block. As DO’s tutorial How To Install Linux, Nginx, MySQL, PHP (LEMP stack) on Ubuntu 22.04[12] notes, server blocks are similar to virtual host files on Apache servers — they contain configurations for the websites you’re running on your server; if you’re running multiple sites with different domain names on your server, server blocks tell it what to do when users access it via your various domain names.
DO’s tutorial supplies a server block modified from the default version to add PHP functionality. It suggests you create a new block for the domain name you’re using with the VPS. As before, I’m using timmassey.website and you’ll need to use your fully qualified domain name if you have one.
Before configuring a server block, I’m going to change the name of the default directory for storing website files (/var/www/html) to one that matches my site. I’m doing this with the command:
sudo mv /var/www/html /var/www/your_site_nameIf you’re hosting more than one site on the server, you’ll need to organise the respective files in separate directories. Create extra ones with:
sudo mkdir /var/www/your_additional_site_nameNext create a new server block using nano:
sudo nano /etc/nginx/sites-available/your_site_nameI’m looking forward here to securing the server with Let’s Encrypt, and so I’ve combined the initial server block code relating to PHP with that from the GitHub tutorial on securing the server that I’ll be following later.[13] The section of code relating to PHP begins with location ~ \.php$. If you’ve created a php-fpm pool to use with your server block as I’ve described above, call the PHP handler (the .sock file you defined in your php-fpm configuration file) at the fastcgi_pass option — just use the default pool as shown if you haven’t added a bespoke one. Elsewhere, replace your_domain_name with the one you’re using:
server {
        listen 80 default_server;
        listen [::]:80 default_server ipv6only=on;

        server_name your_domain_name www.your_domain_name;
        root /var/www/your_server_name;

        index index.php index.html index.htm index.nginx-debian.html;
        location / {
                try_files $uri $uri/ /index.php$is_args$args;
        }

        location ~ \.php$ {
                include snippets/fastcgi-php.conf;
                fastcgi_pass unix:/var/run/php/php8.1-fpm.sock;
                fastcgi_buffers 256 16k;
                fastcgi_buffer_size 128k;
        }

        location ~ /\.ht {
                deny all;
        }
}
Save the server block by pressing ctrl and X, then entering y and hitting return.
We’ve created this configuration file in the /etc/nginx/sites-available/ directory. To activate it, we need to create an equivalent in /etc/nginx/sites-enabled/ with a symbolic link[14] from the original file. Do this by entering:
sudo ln -s /etc/nginx/sites-available/your_site_name /etc/nginx/sites-enabled/I’m also going to delete the default server block files as the one we’ve created does their work:
sudo rm /etc/nginx/sites-available/default /etc/nginx/sites-enabled/defaultTest your configuration for syntax errors with:
sudo nginx -tIf all looks good, restart Nginx to load the recent changes by inputting:
sudo systemctl reload nginxIf you’ve created a php-fpm pool to use with this configuration, it runs under the user and user group name you created for the pool. We need to give the pool’s user and group ownership of the root directory so that it can run PHP from it. Use the chown (change owner) command to do this:
sudo chown -R your_username:your_user_group_name /var/www/your_site_nameFinally, we can check that PHP is functioning by creating a simple PHP file in the web root directory and loading it in a browser. Back to nano to do this:
sudo nano /var/www/your_site_name/phpinfo.phpCopy the following code snippet into the new file:
<?php
phpinfo();
Save the file by pressing ctrl and X, hitting Y and then return. Now open a browser window and enter your_domain_name/phpinfo.php in the address bar. If PHP is up and running, you’ll see a page that looks something like this:
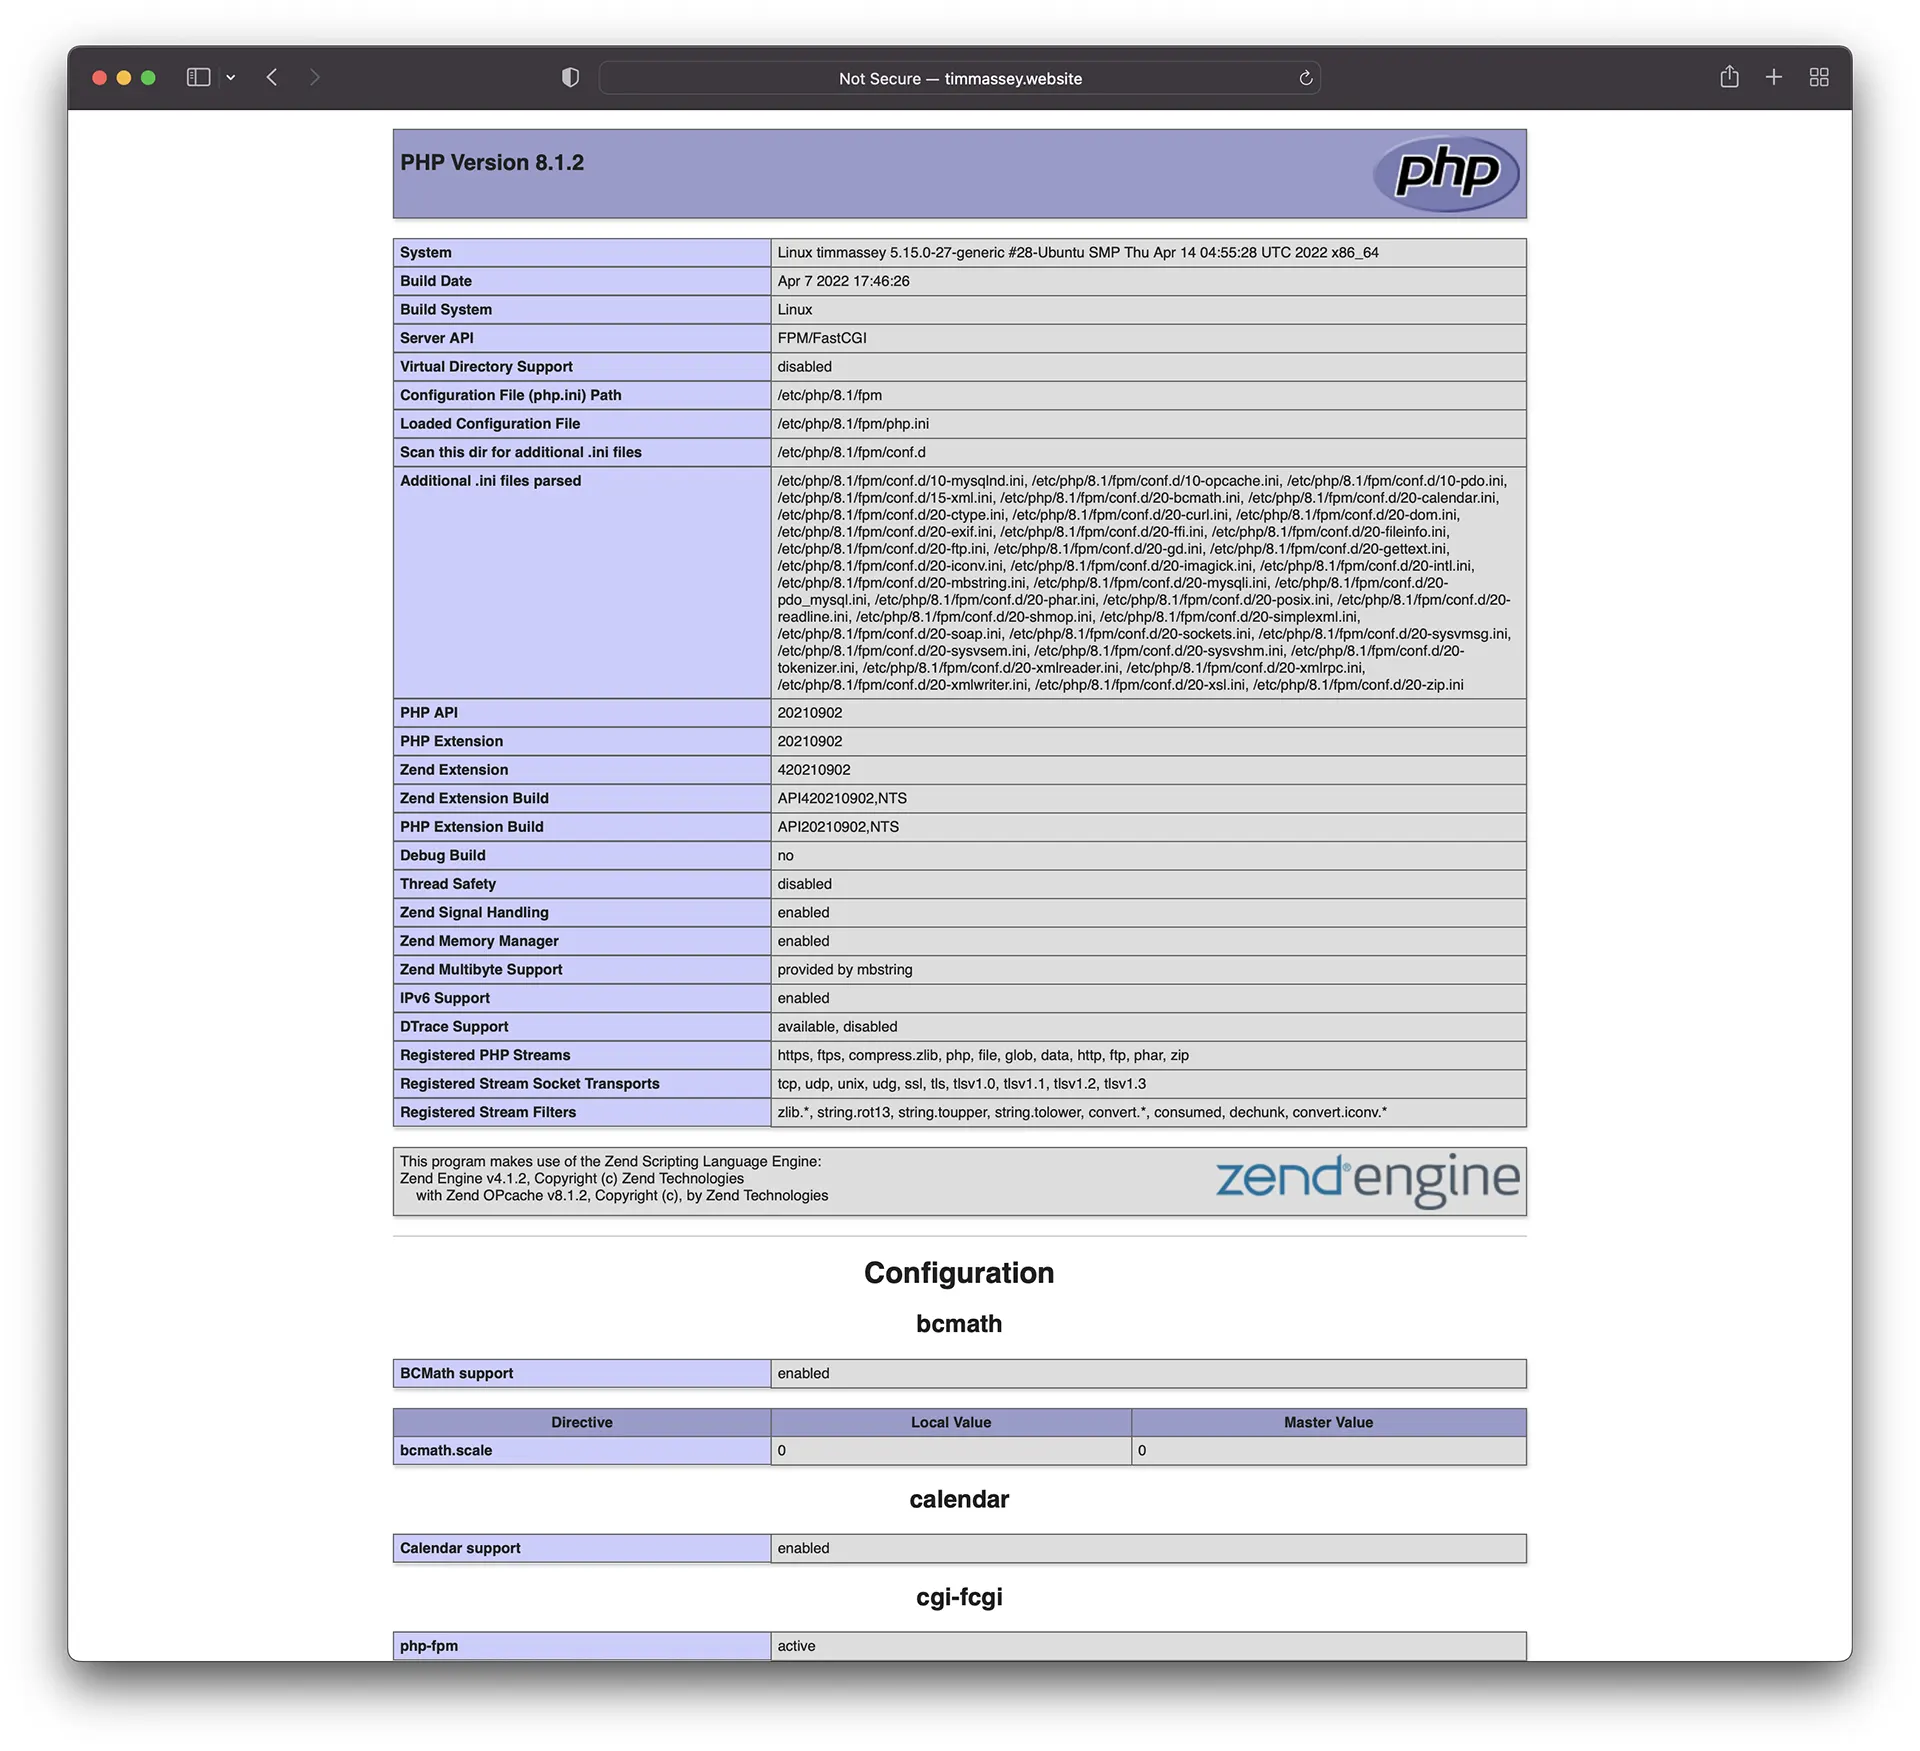
Make a note of the Loaded Configuration File listed amongst the initial settings in the first table above — in this example, the file is /etc/php/8.1/fpm/php.ini. We’ll edit the php.ini file in the next step to expand the memory allocated for PHP to avoid errors when running WordPress.
When you’ve done the above, delete the PHP test page to avoid giving away information about your server that could make it vulnerable to attack. Delete the phpinfo.php file with:
sudo rm /var/www/your_site_name/phpinfo.phpEditing php.ini to avoid upload max filesize errors in WordPress
The default options allocating PHP’s memory usage are conservative and need adjusting to avoid errors when uploading content to your eventual WordPress site — I’ve generated errors when importing existing WordPress databases into a fresh installation and when adding images to galleries on sites with unadjusted PHP memory settings. Press Customizr’s post How to fix maximum upload and php memory limit issues in WordPress ?[15] describes the errors that result from the default PHP memory settings and suggests replacement values. I’m using the settings suggested in the article here (excluding ‘upload_max_size’ — which is listed in the article, but appears not to be an actual php.ini variable (it’s possibly a partial duplicate of upload_max_filesize, which is present and included below) — and max_input_time, which comments in php.ini recommend setting to 60 seconds on production (live) servers — I’ve not experienced errors with this setting and so feel it’s better to leave it at the recommended default.
Edit your php.ini file (that we identified above) using nano:
sudo nano /etc/php/php_version_number/fpm/php.iniFind the following options using nano‘s ^W Where Is search tool listed at the bottom of its edit screen — type Ctrl and W to activate the search box — and edit the default settings as shown below:
; Maximum amount of memory a script may consume (128MB)
; http://php.net/memory-limit
memory_limit = 256M

...

; Maximum size of POST data that PHP will accept.
; Its value may be 0 to disable the limit. It is ignored if POST data reading
; is disabled through enable_post_data_reading.
; http://php.net/post-max-size
post_max_size = 64M

...

; Maximum allowed size for uploaded files.
; http://php.net/upload-max-filesize
upload_max_filesize = 64M

...

; Maximum execution time of each script, in seconds
; http://php.net/max-execution-time
; Note: This directive is hardcoded to 0 for the CLI SAPI
max_execution_time = 300

...
Save the file by pressing Ctrl and X, selecting Y and then hitting return. Now apply the above changes by restarting php-fpm:
sudo service php8.1-fpm restartWe’ve now finished piling up the LEMP stack. Before perching WordPress on top of it, though, I’m going to secure the server with Let’s Encrypt.
Notes and references